A Quick Estimate for Paintable Wall Area
Estimate paintable wall area from rough dimensions, openings, and wall shape so you can plan a small decorating task without false precision.
The most common mistake in estimating paintable wall area is treating a rough guess as an exact measurement. That can leave you planning from a number that looks precise but ignores a doorway, a sloped ceiling, or a wall that is not quite rectangular. For a small decorating task, a sensible estimate is enough to plan the work; buying paint still calls for checking the product label and the surface.
Paintable wall area is the face of the wall you expect to cover, expressed as square feet or square meters. The quick method is to estimate the wall’s width and height, multiply them, then subtract large openings you will not paint. What fits depends on your wall and on how you intend to use the result.
Use the basic estimate for one plain rectangular wall
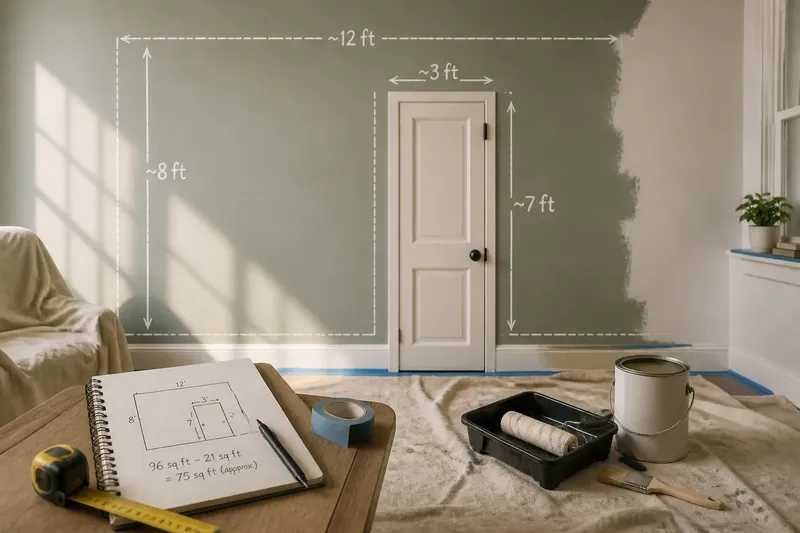
If the wall has a level floor, a level ceiling, and no major changes in shape, estimate its width and height in the same unit. Multiply those estimates to get the wall’s gross area. For example, a wall estimated at about twelve feet wide and eight feet high has a gross area of about ninety-six square feet.
That calculation is an area estimate, not a claim that every part of the rectangle will receive paint. A window or door takes up space, while trim, built-ins, or a surface you plan to leave untouched may also change the paintable portion. Decide what counts as part of the painting task before adjusting the number.
Choose a unit you can measure comfortably. A tape measure marked in feet and inches works well for a typical room; a metric tape makes meters or centimeters convenient. If you record a width in feet and a height in inches, convert one before multiplying. Mixing units is like measuring a shelf with one end of a ruler in inches and the other in centimeters: the multiplication cannot make the mismatch disappear.
Subtract openings only when they change the plan
For a broad opening, estimate its width and height, multiply them, and subtract that area from the gross wall area. A door that reaches the floor is often easy to exclude when you are estimating paint for the wall surface alone. A small outlet, narrow trim strip, or tiny fixture usually does not merit a separate calculation for a modest task.
Use judgment rather than chasing every detail. If you plan to paint a door or window trim, do not subtract that surface from the wall estimate as though it were unpainted; instead, treat the trim as a separate surface with its own material needs. If the opening is recessed, the inner sides may also need paint, depending on the finish you want.
Say you estimate a wall at roughly twelve feet by eight feet and it has a door you estimate at three feet by seven feet. The gross area is about ninety-six square feet, and the door area is about twenty-one square feet, leaving an estimate of roughly seventy-five square feet for the flat wall face. That invented calculation is useful for planning, but the rounded dimensions and any uncounted trim mean the result should stay rounded too.
Choose a different approach when the wall is not a rectangle
For a wall with a sloped ceiling or a stair-step outline, split the visible face into simple shapes. Estimate each rectangle separately, then add the areas; for a triangular section, multiply its base by its height and divide by two. Subtract large openings afterward if they are within the shapes you counted.
This shape-by-shape approach is a better fit than forcing an irregular wall into one width-and-height rectangle. It also makes it easier to see where an estimate is rough: a difficult-to-reach angle or curved edge may deserve a little extra caution. Do not add a complicated precision ritual for a small patch; mark the area as approximate and keep the decision proportional to the task.
If the wall wraps around a corner, estimate each flat face as its own rectangle. Include only the faces you intend to paint, and avoid counting the same corner area twice. For a shallow alcove, decide whether its back and side walls are included, then estimate those surfaces separately.
Use a rough estimate for touch-ups, not a purchase promise
For a small touch-up with paint already on hand, an approximate wall area can help you judge whether the task is limited to one section or extends across most of a wall. The exact area may matter less than whether the existing paint matches and whether the surface needs preparation. A wall estimate cannot answer those questions by itself.
For buying paint, compare your estimate with the coverage information on the can or manufacturer’s product page. Coverage can vary with the paint, the wall’s texture, its condition, the color change, and the number of coats planned. Follow the label and manufacturer instructions, and account for the finish and surface you actually have rather than treating the wall-area calculation as a purchase quantity.
If the estimate will guide a larger decorating job, a textured surface, multiple rooms, or a strong color change, measure more carefully and ask a paint supplier or qualified decorator if you are unsure. A quick estimate is for sorting the task and forming a starting point, not replacing product guidance.
Which estimate fits your wall?
Can I estimate without a tape measure?
For an early, low-stakes plan, you can use a known reference such as a door’s approximate dimensions or a measured object, but treat the result as especially rough. If the number will affect what you buy, use a tape measure and record the wall’s width and height in one unit.
Should I subtract every window and outlet?
Subtract large openings when they take up a meaningful part of the wall and will not be painted. Tiny interruptions rarely improve a small-task estimate enough to justify the extra work, while trim that you plan to paint should be considered separately.
What if the ceiling slopes?
Break the wall face into rectangles and triangles, estimate each shape, and add the areas. If the outline is awkward or the estimate will inform a substantial purchase, use more careful measurements instead of relying on a rough bounding rectangle.
Does wall area tell me how much paint to buy?
It gives you a surface-area starting point, not a complete paint quantity. Check the product’s stated coverage and instructions, then account for the wall condition, texture, color change, and coats required.
Keep the number as rough as the measurements
Write down the dimensions you estimated, the openings you subtracted, and the unit you used. Round the final area to a sensible level rather than displaying extra decimal places that the original measurements do not support. That small note makes it easier to revise the estimate if you notice a missed section.
A quick estimate for paintable wall area works best when it answers a limited question: is this a small, straightforward surface, or does the wall call for closer measuring and product guidance? Use the simple rectangle for a plain wall, split unusual outlines into shapes, and reserve detailed measuring for decisions that depend on it.
Before you start, walk the wall once and look for anything the calculation does not represent: a return around a corner, a built-in, a high section above a cabinet, or trim you intend to coat. That visual check often catches the useful correction without pretending a rough estimate is exact.